
Petals Around The Rose
This is the first tutorial I’ve made for this site, so it might be a bit rough. I did force several friends through the tutorial, and they seemed to do just fine. Just make sure that you have Qt properly installed, with the proper software kit - Qt 5.15.2 (MinGW 8.1.0 64-bit). In addition, I don’t explicitly say where to put the various widgets on the ui in the Widget Mania section, so when placing the widgets on the ui look to Figure 1 for guidance.
Below are Quick Links for the various steps of the tutorial.
Good Luck.
Quick Links
Project Scope (What Are We Doing?)
Petals Around The Rose is a mathematical induction puzzle. I was first introduced to it in a calculus class. It’s a pretty “simple” game. There are six dice that are rolled, and you must deduce the answer. There are two hints or “rules:”
The name of the game is Petals Around The Rose, and the name is significant,
The answer can be 0, or an even positive number.
From those hints you must deduce the solution method. Of course, you’ll probably need to get a subset of answers first, to help with your deduction, but those hints given above are enough.

In this tutorial we’ll be making a “simple” Petals Around The Rose puzzle game. The layout of the GUI is shown in Figure 1. The game flow is simple: press “Roll” to start a game, put in your answer in the answer box, press the “Check” bottom to check your answer, then the correct answer should appear in the answer box, in green if you’re correct, or red if you’re a sad panda – don’t be a sad panda.
Below is the download link for the petals program so you can try it yourself before you make it. The link is kinda clunky it uses DropBox to deliver the .exe file. Below the .exe link is another link to a zip file containing the install program, which may be a bit easier to use.
Petals .exe Download Through DropBox
Tools (Equipment & Software)
What you need to have to do this tutorial:
Qt with the Qt 5.15.2 (MinGW 8.1.0 64-bit) kit
The seven images below are for the fancy game graphics. Right click each of them and save them to a folder. You'll need them later in this tutorial
The TDP icon, in the top left of the GUI, isn't included in the pics, so your program won't have the TDP icon, but it will be identical otherwise.


Implementation (The "HOW")
This program consists of 16 widgets (Figure 2), all of which will be coded automatically by the Qt user interface (ui) – Widgets, are basically GUI objects. Qt makes GUI programming easy. All we’re going to do in this program is add a couple of “slot” functions for the “Roll” and “Check” buttons shown in Figure 1. The rest of the coding will be handled by Qt. The 16 widgets in this program are numbered in Figure 2. These will all be made in the ui.

Figure 2: All the widgets used to display the Petals Around The Rose application. Below is a short description off the widgets.
- 1 to 6 - QLabel widgets with die background.
- 7 to 10 - QLabel widgets showing static text.
- 11 to 12 - QPushButton widgets.
- 13 - QLineEdit widget for input.
- 14 - QGroupBox widget used to group other widgets for display.
- 15 - QLabel with the a rose picture background.
- 16 - QMainWindow widget - the BIG PAPA!
This tutorial will consist of four parts. The first part will walk you through creating a Qt project, making the needed files for the application, and making a Resource file directory to store those fancy die pics that yours truly made (you're welcome). The second part will create the widget objects shown in Figure 2 and editing their parameters appropriately. The third part will be the actual coding (YAY). The fourth and final part, will walk you through turning our project into an executable. In summary then the first part we'll call "File Setup," the second is "Widget Mania," the third is "Coding Just Because," and the fourth is call ".EXE for Me!"
The project consists primarily of four Qt files:
A header file called petals – contains the definition of the petal class used to control the application. It consists of five functions, and one class variable
Petals Class file - the “How” of the petals Class. Basically, it prescribes what the definition file constructs actually do – that is, it tells the compiler “how” the class works.
Main file - this is where the petals class gets called and displayed,for the world to see. In addition, the event loop starts here. All good things start in the main.
Petals ui file – the user interface (ui) file will make creating the function definitions and description declarations a cake walk. Also, the signals and slots will be dealt with here.
Part 1 (just below) will create these 4 files and create the resource directory used to store those AMAZING die pictures you grabbed earlier.
PART 1: File Setup
Open Qt, and from the File menu select “New File or Project…,” as shown.

In the New Project dialogue window select “Application -> Qt Widget Application,” and click “Choose” as shown.

Give your project a name (presumably Petals), and choose the location for the project, then click "Next."

Select the qmake Build system and click “Next.”

Type in the name of the class – “Petals.” Notice that 3 files are being generated in this step with the same name, but with different file types (e.g. .h, .c, and .ui). Click “Next.”

We won’t be doing any translating option. Select “<none>” and then “Next.”

This is where kits are selected. Kits are the environment that the program is developed for and contain environmental information needed for deployment. Select the Desktop Qt 5.15.2 MinGW 64-bit, and select next.

We’ve arrived at the summary page. You’ll notice that it contains all the files mentioned in the programming primer section, and an additional project file (the .pro file)……Isn’t that cool – click “Finish.”

Now in the Project’s box all 4 files from the programming primer should be viewable in the file directory. Even that project (.pro) file I haven’t bothered to explain…… Don’t hold your breath on that explanation.

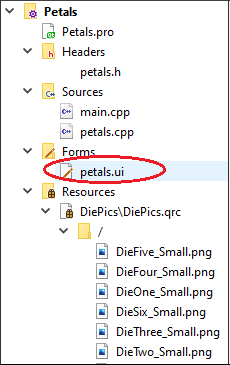
Remember those amazing die pics up in the tools section? Those need to be saved somewhere on your system so they can be used in our Petals Around The Rose game. More precisely, you should make a file in your Qt Petals directory named DiePics, as shown below, and place them there. Your file should contain all the PNG files shown below, it shouldn't have the .qrc file - yet.

Right click on the main Petal folder in the Projects window, and click on "Add New..."

In the New File - Qt Creator window select "Qt -> Qt Resource File" and "Choose."

Name our resource "DiePics," and click browse and select the DiePics folder location (the folder where you put the die pictures), then click "Next."

If the next dialog that pops up looks like the one below click "Finish," if it doesn't you're a sad panda and no one actually likes you - sad.

Once you're done with the last step the Qt screen should look as the one shown. Click on "Add Prefix." This basically gives you a resource "folder" to add resources to.

Hopefully, you made a folder in your Petals Qt project and filled it full of those amazing pic you got from the Tools section above. If you didn't already do that, you should do that now. If you did then click "Add Files" and add all the die to your resources. Clear any text generated in the Prefix box.

Once you've added all the die images then you should be able to see all of them via the .qrc file as shown below. Make sure you save all (CTRL+S) the files to make that "*" go away....

Part 1 is DONE! Yay!
PART 2: Widget Mania
Congratulations! You’ve made it to Part 2. Now it’s time to play with widgets. As stated previously, this project requires 16 widgets, which are all labeled and described in Figure 2. Qt has a pretty keen design interface that will make adding widgets a breeze.
The UI Design Interface is shown in Figure 3. If this interface isn’t shown, and you have the Petals project open in Qt, then just double click on the petals.ui file under the Forms folder, in the Project box, and the design interface should appear.
If you are in the design interface view and you want to get back to the Editor view interface, then simply click on the scroll down menu as shown and choose “no document.”

Now before we get started on Part 2, let’s go over the Qt Design Interface a bit. This isn’t going to be an in depth explanation, we’re only going to be using 4 sections in Part 2. These 4 sections are labeled in Figure 3, and they are: the Widget Box, the Form Editor, the Object Inspector, and the all Powerful Property Editor.

Widget Box: this is box is used in the Qt Designer Interface to drag and drop widget objects onto the main Form. We will be using the Widget Box to drag and drop 15 of the 16 widgets onto our GUI application. The widget box is broken up into 8 different categories of widget types: Layouts, Spacers, Buttons, Item Views, Item Widgets, Containers, Input Widgets, and Display Widgets.
Form Editor: where we give our application shape and "form." This is where we drag our widgets from the Widget Box to, and drop.
Object Inspector: all of the widgets we drag and drop onto the main Form will be viewable in this window. Their class will be seen in this screen as well as the class name.
Property Editor: once we drag and drop a widget onto our form, it's properties (including it's name) can be modified using the Property Editor.
The overall flow of Part 2 will go like this: grab a widget from the widget box and drop it onto the main form, and then edit the properties in the property editor. As you add widgets you'll see the Object Inspector populate with them. Of course, there are a couple more details but that's the brunt of it.
Starting from the Qt Designer Interface, you should see a blank form like the one directly below. Click on the form and the form's properties will be displayed in the Property Editor as shown below.

Below you'll see the selected form's properties. Change the Width to 750, and the height to 390.

Now it's time for us to Add our first widget label! Scroll through the Widget Box and find the Display Widget heading. Under that heading you should find a Label widget, just drag and drop it into the form box. In the Property Editor, Change the objectName to Die1, and change the Height and Width parameters to those shown in the picture below - 115 and 113, respectively.

Now it's time to use those fancy graphics you made into Resources in Part 1. Go to the styleSheets property and click on the "..." button.

The Edit Style Sheet box should pop up. Click on the Add Resource scroll down tab and select "background-image." Once you click on "background-image" the Select Resource dialogue box should appear. Select DieOne, and select "OK."

Notice the url address within the parenthesis (:/DieOne_Small.png). Note, that the image selected is "DieOne_small.png" which is the name I gave to the One die image.

At this point you should have a single die image visible on your petals Form, named Die1, and if consistency is important to you, it should be displaying the one die. Make 5 copies of the Die1 widget, by selecting it with the pointer and pressing "CTRL + C," or right click the widget and select "Copy," then press "CTRL + V" to paste a copy on to the Forum. Rename this new Copy of Die1, to Die 2 and change the image in the stylesheet to reflect the Two Die. Finally, arrange it next to the Die1 widget. Repeat this process until you have all six Die displayed on the forum similar to Figure 1. Make sure that you have each die image shown
Now that you have we have how dice in place, it's time to make our buttons. The first one we will make is the "Roll" button, followed by the "Check" button which will be will be virtually the same property wise, the only difference will be the objectName, and the displayed text on the button. Drag a Push Button over from the Widget Box over to the main petals form. Once this is done, with the new push button selected, change the objectName to Roll_Btn, and change the Width and Height parameters to 50.

After the name and size of the push button are set, change the text to "Roll," so the user knows what it does - shown below. Once this is done you can copy and paste the new Roll button using "CTRL+C" and "CTRL+V" to duplicate the button, then change the objectName of the new button to Check_btn, and alter the displayed text to "Check." Now both buttons are done!

The "Your Answer:" label is next to drag into existence. This is a QLabel widget type, which we've previously dragged and dropped before (see step 1). Again, just drag and drop a "Label" widget from the Widget Box, under the Display Widgets, and while the widget is selected edit it's properties as shown below. You're only changing it's Height, Width, Font size, alignment, and text display.


Next, we're going to add our Input Box - that is the box where we type in our input. This widget is located in the Widget Box, under the Input Widgets category, as shown below. Just drag and drop a InputBox over to your main form, and edited the ObjectName, Width, and Height properties as shown in the Property Editor.


Now we need to create a QLabel widget to display the result of a given roll. Drag an drop a QLabel widget into the form and place it accordingly. Change the objectName to "Ans," the Width to 161, the Height to 71, and the font size to 54 because we want the answer to pop out. All this is shown below.


We want to make the Answer really pop out, so we will be adding additional styles to it. Click on the "..." in the styles Value column, in the Property Editor, and add the border style shown below with the "border: 2px solid black;" line in the Stylesheet edit box. In addition add a "?" to the text Value, and adjust the text alignment.


We're almost done layout our widgets - YAY! Next we're going to add a GroupBox from the Widget Box. The GroupBox is under the Containers group - just drag and drop the widget into the appropriate location. In the Property Editor change the objectName to RuleBox, change the Width to 591, change the Height to 91, change the Point Size to 13, and check the Bold, and Underline check boxes.


Go to styleSheets, click "..."
Add "background: rgb(249, 157, 255);", and "border: 2px solid black;" to the Style Sheet editor box, and click "Ok."


Oh, to be so close to "Done!" Now we add our last two QLable widgets. These Labels will tell our Petal players what the rules are, so we'll need two of them but their properties will be identical, so we can make one and simply copy and paste, as we've done previously. Without further delay, drag and drop a QLabel widget from the widget box and place it into the Groupbox we just made. Once this is done, with our label still selected, change the Point Size to 10, change the Width to 481, the Height to 31. Since we placed this widget inside the Groupbox widget, it will inherent it's stylesheet properties and we don't want our rule labels to have independent borders. Bring up the styleSheet of the QLabel and type "border: none;."


Now it's time for us to another Widget label! Scroll through the Widget Box and find the Display Widget heading. Under that heading you should find a Label widget, just drag and drop it into the form box. In the Property Editor, Change the Height and Width parameters to those shown in the picture below - 81 and 91, respectively

Go to the styleSheets property and click on the "..." button.

The Edit Style Sheet box should pop up. Click on the Add Resource scroll tab and select "background-image." Once you click on "background-image" the Select Resource dialogue box should appear. Select the Rose.png resource and select "OK."

And just like that, our widgets were all in their proper place! Your Forum should look like the one below.
PART 3: Coding Just Cause
If you haven’t solved the puzzle yet, and want to, then do not go any further. However, if you’ve solved it, or are just here to go through the QT development flow, then “Away We Go!” At this point if you run the program, you’ll get a very pretty window display of our 16 widgets that we pain staking laid out. Of course, it doesn’t do anything but we’re about to fix that.
The Roll and Check buttons are the only controls of our program, outside of the general window controls on the top right of the program (i.e. minimize, maximize, and quit, controls). We’ll describe/explain the Roll button, then the Check button, but first let’s talk about the overall flow of the program. There are roughly 4 programming files in our project: petals.h, petals.cpp, mail.cpp, and petals.ui. The main.cpp file is the program responsible for creating an instance of the petals class, showing the user interface (UI), and starting the execution loop. The code below is the main routine, all of which was written by QT when we completed the File Setup step –minus the comments of course.

We will describe the Roll button, and Check button code shortly, but first we need to do some setup for those routines. We’re going to use a class variable to store the answer for a given roll, and we’re going to use a function called “myDie” to return the file and file path of the die pics. These will be added first in the “Setup Step.” The rest of the code will be described in the “Roll Code,” and “Check Code” sections.
Setup Step
There are three parts to this section: add a class int variable called Answer to the petals class, place a function prototype near the top of the petals.cpp program, change the window heading to "Petals Around The Rose," add the "TDP" window icon, and create a function description for that function prototype in the petals.cpp file. It’s pretty straight forward.
In this first setup step, we’re adding an Answer variable to the petals class with a single line in the petals header file (petals.h):
int Answer = 6;
Setting it equal to 6, will yield a correct initial answer result provided you set the die up in the initial order of 1, 2, 3, 4, 5, 6.

Now to implement the proto function of the myDie function. Again, this is only a single line of code placed just above the petals class description in the petals.cpp file.
QString myDie(int);

The final item on our Setup Step To Do list is the myDie function description. As can be seen from the picture below, all this function does is return a QString (theDie) corresponding to the input parameter (myNum) which in turn will reference a die roll. The myNum value is then used by a switch statement to point to the correct file directory of the given die pic.
QStringmyDie(int myNum){
QString theDie;
switch(myNum){
case 1: theDie ="QLabel{ background-image:url(:/DieOne_Small.png);}"; break;
case 2: theDie ="QLabel{ background-image:url(:/DieTwo_Small.png);}"; break;
case 3: theDie ="QLabel{ background-image:url(:/DieThree_Small.png);}"; break;
case 4: theDie ="QLabel{ background-image:url(:/DieFour_Small.png);}"; break;
case 5: theDie ="QLabel{ background-image:url(:/DieFive_Small.png);}"; break;
case 6: theDie ="QLabel{ background-image:url(:/DieSix_Small.png);}";
break;
}
return theDie;
}
Once you've entered the code into your petals file make sure you save it and build the program to check for syntax errors.
Roll Button Code
The Roll button is responsible for “rolling” the dice, storing the answer for a given roll, restoring the input and Answer boxes to their start conditions. Of course, the Roll button doesn’t handle these responsibilities in that order, but rather in the order shown in the list below.
Roll Pseudo Code
1. Clear Answer input
2. Reset output to "?" with black border
3. Reset Answer value
4. Roll die & calculate answer
Right click on the Roll button in the petals.ui QT Design Interface, then click "Go to slot" and select the "clicked()" option as shown below.


After the previous step Qt makes an "on_Roll_Btn_clicked" event function, it's here where we will place our Roll button code.

The first 4 lines of the Roll button code (shown below), create a QString used to store the die file path, and reset the answer variable and display:
QString dieImage;
Answer = 0;
ui->Ans->setText("?");
ui->Ans->setStyleSheet("QLabel{color:black;border: 2px solid black;}");
ui->InputBox->clear();
Now we have to create an int called myRans, which will be our random number used to "roll" our die, generate a random number from 1 to 6, get the die image corresponding to that number, set the image to die 1, and add to the answer value if the roll number is 3 or 5.
int myRand;
myRand = rand()%6 + 1;
ui->Die1->setStyleSheet(dieImage);
if(myRand == 3){
Answer+=2;
}
if(myRand == 5){
Answer+=4;
}
Step three just generated the die roll for the first die, we have to repeat the code for the next five die. The code you just entered is basically repeated except for the myRand variable declaration, and in instead setting the stylesheet for Die1 we're going to do it for the other five die.
//Die 2
myRand = rand()%6 + 1;
dieImage = myDie(myRand);
ui->Die2->setStyleSheet(dieImage);
if(myRand == 3){
Answer+=2; }
if(myRand == 5){
Answer+=4;
}
//Die 3
myRand = rand()%6 + 1;
dieImage = myDie(myRand);
ui->Die3->setStyleSheet(dieImage);
if(myRand == 3){
Answer+=2;
}
if(myRand == 5){
Answer+=4;
}
//Die 4
myRand = rand()%6 + 1;
dieImage = myDie(myRand);
ui->Die4->setStyleSheet(dieImage);
if(myRand == 3){
Answer+=2;
}
if(myRand == 5){
Answer+=4;
}
//Die 5
myRand = rand()%6 + 1;
dieImage = myDie(myRand);
ui->Die5->setStyleSheet(dieImage);
if(myRand == 3){
Answer+=2;
}
if(myRand == 5){
Answer+=4;
}
//Die 6
myRand = rand()%6 + 1;
dieImage = myDie(myRand);
ui->Die6->setStyleSheet(dieImage);
if(myRand == 3){
Answer+=2; }
if(myRand == 5){
Answer+=4;
}
Remember to save your progress and then build your file to ensure that there are not any glaring mistakes.

Check Code
The Check code routine is pretty basic: it compares the answer in the InputBox with the actual answer of the 6 die rolls, if they're the same then the Answer Box gets turned green, if not the answer Box turns red. Pretty simple! So here we're going to add a signal and slot like with the Roll button, and add the code.
Right click on the Check button in the petals.ui QT Design Interface, then click "Go to slot" and select the "clicked()" option as shown below.

Qt makes us an "on_Check_Btn_clicked()" function spac3e to place all our on clicked() code. Again, this is where we will put all our check button code.

Below is the Check code. Simply copy and paste it to your "on clicked()" code section.
int urAns;
QString LBox = ui->InputBox->text();
if(LBox==""){
urAns =-3;
}else{
urAns = LBox.toInt();
}
if(urAns == Answer){
ui->Ans->setStyleSheet("QLabel{color:green;border: 2px solid green;}");
}else{
ui->Ans->setStyleSheet("QLabel{color:red;border: 2px solid red;}");
}
ui->Ans->setText(QString::number(Answer));
Once again, save your files and build your project, to ensure there aren't any syntax errors.
At this point you should be able to run your program with the play button in the Qt IDE. However, we want to make a .exe file that we can run without the Qt program running - this is the next step.
PART 4: .EXE For Me!
It’s time to make the .exe file. Currently, you should have built the project a couple times, as instructed to do in the Coding Just Cause section of this walkthrough. This caused the Qt program to make a build folder as shown below. In this build folder there is a debug folder that contains a Petals.exe file, which we're going to require for the next step of this process.

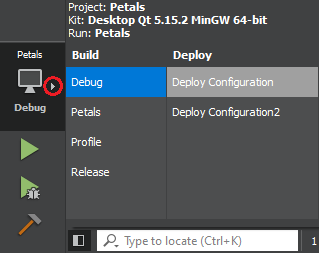
There are some additional build configurations that may affect what it names the build file. To ensure consistency make sure that your build configuration is set to Debug and Deploy Configuration (see picture below). If it wasn’t, set it to the Debug and Deploy Configurations and then build the project again.
Once this is done, you’re now ready to "make" your .exe file. However, if you try to run the file outside of Qt you’ll get several “Sad Panda” system failures. The steps in this section will remedy this. Below shows the contents of the debug folder in the build directory. The icon is different from yours, but that's because I did some modifications in the project file to add some fanciness to the project!

You'll need this .exe file for the first step in making the .exe program runnable.
Go to your File Explorer and make a file to put your Petals program into. You can see below that I made a folder called Petals Walk Through to put my Petals program in. Once this is done, copy and paste the Petals.exe file, from the build directory, into your new empty folder as shown below.

It's time to make some fancy dll's! Type "Qt 5.15.2 (MinGW 8.1.0 64-bit)" into the windows search screen - run the program.

Alternatively, you can find the kit file in Qt directory as shown below.

Now get the file directory path for your Petals folder from the File explorer, by navigating to the directory and then right clicking on the "directory box," and copying the address, as shown below.

Type " cd " and then copy and paste (CTRL +V) file path into the the Qt 5.15.2 console program or type the whole thing out: "cd YourFileDirectory Here". Then press enter.

Next type "windeployqt Petals.exe" and hit enter.

Now the dll generation magic will occur and your console screen should look like this. We're pretty much done at this point - yay!

Outcome (Did It Work)
If you followed all the instructions as intended, you should have a Petals Walk through file (or an equivalent) like the one below. The Petals.exe should be a runnable application. If not, well bummer, try try again.
