
Meet the STM32
Think the chip in your toaster is boring? Think again. The STM32 powers everything from drones that map forests to dishwashers that judge your dirty plates — and it’s cheap enough to lose between the couch cushions. We just finished building the Ghetto DAC, and now we need a way to scientifically measure exactly how gloriously ghetto it is. Enter the STM32.
Before we start flinging FFTs like ninja stars, let’s take a quick detour through the STM32 design flow and meet this beast of a microcontroller family — a lineup with hundreds of variants, each more tempting than the last.
Project Scope
Why do NASA rovers, Tesla dashboards, and your coffee maker have something in common? Because sometimes one chip can do it all — and the STM32 is that chip. In this series, we’re going to show you exactly how to harness it, without drowning you in datasheets.
We’re not going to cover every feature (that would take a lifetime and a lot more coffee), but we will walk you through enough “Hello World” moments to get you dangerous. You’ll learn the design flow, get comfortable in the IDE, and then we’ll turn you loose on the fun stuff: reading sensors with the ADC, pressing buttons that actually do something, and talking to a slick OLED display.
By the end, you won’t just know what an STM32 is — you’ll be the kind of person who can make one sing, dance, and maybe even brew coffee.
Tools (Equipment and Software)
Hardware:
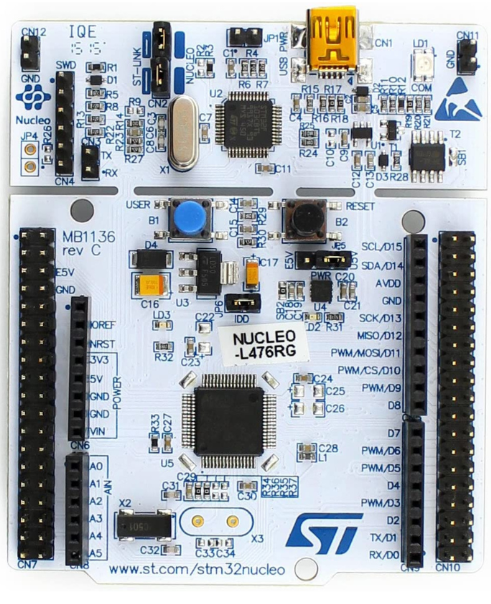
STM32 Nucleo-L476RG board
Potentiometer (e.g., 10 kΩ)
GME12864-11 OLED display (I²C version)
Breadboard + jumper wires
Optional RC filter for smoothing PWM output
Software:
STM32CubeIDE
Implementation (The How)
Jumping into STM32 development can feel like stepping into a jungle, but fear not — these tutorials are your trusty machete and compass, slicing through the complexity one step at a time. Each walkthrough is crafted to build your confidence and skills, starting with the basics and quickly leveling up to cooler, flashier stuff you’ll actually want to show off.
Blinking LED (IDE Smoke Test)
First things first: let’s make sure your STM32 setup isn’t broken. This tutorial gets you blinking an LED — the classic “Hello, World!” of embedded systems. If your LED blinks, your IDE is talking to your board, and you’re officially in business. No mystery code generation errors, no fiddling with mysterious
.iocfiles. Just pure, satisfying LED blinks.Slider Potentiometer-Controlled PWM LED
Now that the basics are locked down, we crank it up a notch. Using a slider potentiometer and Timer 2, you’ll make the LED brightness dance to the analog tune of your slider. Slide it up or down, and watch the LED fade brighter or dimmer — real-time hardware interaction that introduces you to ADCs and PWM without making your brain hurt.
OLED Display with Switchable Screens
Ready to get fancy? This tutorial adds an OLED display to the mix. You’ll learn how to show your website’s logo, and also how to display the slider pot’s voltage — switching between them with a flick of a switch. It’s a hands-on dive into I2C communication, user inputs, and dynamic display updates. Flashy, fun, and definitely brag-worthy.
Outcome (Did it work)
If your LED blinked like clockwork, the slider smoothly controlled its brightness, and the OLED displayed your logo and voltage without a hitch, you’re golden! The setup worked as intended — no nasty errors, just clean, satisfying results.
If things didn’t go perfectly, don’t stress. Double-check your wiring, .ioc configurations, and clock settings. These little details usually trip people up. And if you’re still stuck, I’m here to help you troubleshoot and get things running smoothly.
Now that the basics are behind you, you’re ready to dive into more exciting STM32 projects. Keep at it — you’ve got this!